Reese Cup Ice Cream Cake isn’t just dessert—it’s a summer statement. This no-bake masterpiece layers creamy vanilla ice cream, rich peanut butter, crushed cookies, and everyone’s favorite candy: Reese’s Cups. Whether you’re planning a celebration or just want to indulge, this frozen cake brings together everything we love in one ridiculously satisfying slice. In this article, you’ll get the backstory, the assembly process, creative twists, and storage tips—all while keeping the process smart, simple, and seriously delicious.
Reese Cup Ice Cream Cake and the Craving That Started It All
Reese Cup Ice Cream Cake Was Born from One Late-Night Craving
Reese Cup Ice Cream Cake was never supposed to be a “thing.” But one night, after a heatwave-drained day, I needed dessert. Not just anything—I wanted cold, chocolatey, peanut buttery perfection. I had some crushed chocolate cookies, peanut butter, vanilla ice cream, and a stash of mini Reese’s Cups. With zero desire to turn on the oven, I started layering. That’s when Sweetain’s most-loved frozen dessert came to life.
The magic? It felt like dessert that you actually want to eat. Fun to make, beautiful to slice, and impossible not to devour. Every bite packs a hit of peanut butter, chocolate crunch, and that soft ice cream melt. It’s the kind of thing that makes people ask, “Wait, you made this?”
Just like the Peanut Butter Cup Dump Cake, this cake isn’t shy about flavor. It’s rich. It’s cool. And yes—it’s Reese-packed. But it’s also shockingly easy to make. No-bake. No mess. Just mix, freeze, and serve.
Why This No-Bake Dessert Works in Real Life
Reese Cup Ice Cream Cake fits into the chaos of daily life beautifully. You can build it in ten-minute chunks—press the crust one night, freeze, add the layers the next day, done. That’s what makes it genius for parties, birthdays, and yes—those Tuesday night sweet cravings.
There’s something joyful about making it. You’re not baking—you’re assembling happiness. It reminds me of other Sweetain favorites like Not Yo Mama’s Banana Pudding: easy, nostalgic, and absolutely worth every calorie. This cake brings the same energy, but with a frosty, peanut butter twist.
Up next, I’ll show you exactly how to build this Reese Cup Ice Cream Cake—layer by layer—with tips to make it your own and tricks to keep it slice-ready every time.

Building the Ultimate Reese Cup Ice Cream Cake: Step-by-Step
Start with the Right Layers (and the Right Texture)
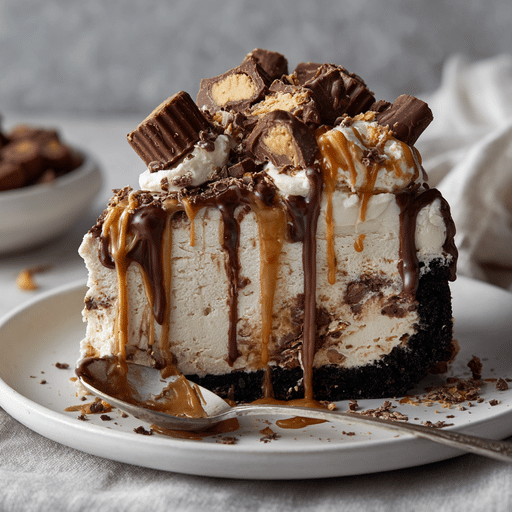
Reese Cup Ice Cream Cake is all about layers. You want contrast—soft and creamy, crunchy and chewy. Start with a cookie crust. Chocolate sandwich cookies work best here. Crush them into fine crumbs, then mix with melted butter to create a firm, delicious base. Press it into a springform pan (or a standard pie dish if you’re keeping it rustic) and freeze it for about 30 minutes.
Next comes your first ice cream layer. Let the vanilla ice cream soften just enough to spread easily. Layer it over the crust and sprinkle on chopped Reese’s Cups. Freeze again until solid. Then it’s time to swirl in the peanut butter layer. You can soften peanut butter with a little whipped topping or cream cheese to make it easier to spread—this step gives you that signature salty-sweet punch.
To finish, add another layer of ice cream (chocolate or vanilla, your call), more Reese’s chunks, and a generous drizzle of fudge sauce. Want to go over the top? Add crushed Ice Cream with Rice Krispies on top for texture and flair. It’s playful and gives you an extra crunch with every bite.
Pro Tips for Making it Like a Pro
Timing is everything. Give each layer enough time to freeze before adding the next—this keeps the layers distinct and beautiful when sliced. Line your pan with parchment for easier removal, especially if you’re not using a springform.
Also, don’t be afraid to get creative with flavor. Try coffee ice cream with peanut butter cups, or add a layer of Banana Pound Cake between the crust and the ice cream for something unexpected. You could even throw in a swirl of caramel or Nutella for extra indulgence.
One last tip: don’t skip the chill time before slicing. Let the cake sit at room temperature for 10–15 minutes, then cut with a warm knife for clean slices. You’ll thank yourself later.
In the next section, we’ll explore some fun variations and dietary swaps—because everyone deserves a slice of this joy.

Creative Variations of Reese Cup Ice Cream Cake That You’ll Love
Switch Up the Flavors for a Twist on Tradition
Reese Cup Ice Cream Cake is delicious in its classic form, but there’s no reason you can’t make it your own. Start with the base: instead of a chocolate cookie crust, try crushed pretzels for a salty crunch. Or go full-on nostalgic with a layer of graham crackers and marshmallow fluff for a s’mores-style upgrade.
Flavor swaps in the ice cream layer can transform the whole experience. Love caramel? Use dulce de leche ice cream. Want a richer chocolate flavor? Layer with chocolate fudge brownie or even mocha almond for a bolder bite. If you’re into fruity twists, banana or strawberry ice cream pairs surprisingly well with peanut butter and chocolate. Reese’s meets fruit? It works.
For those trying to sneak in a better-for-you element, use Good Vanilla Protein Shakes frozen into mini layers between the ice cream for a protein boost that doesn’t sacrifice flavor. You can also opt for low-sugar or dairy-free ice cream alternatives.
Make It Your Own with Custom Toppings and Layers
Personalization is what makes this dessert really shine. Add layers of crunch with toffee bits, chopped nuts, or even cereal like in the Ice Cream with Rice Krispies. If you love peanut butter and banana together, toss in slices of frozen banana or even a ribbon of Banana Pound Cake for a dense surprise in the middle.
For a grown-up version, add a splash of coffee liqueur to your fudge drizzle or soak the cookie crust lightly in espresso. Think of it like an ice cream cake-meets-tiramisu, but with Reese’s at the center.
And don’t forget presentation—top it off with extra Reese’s halves, chocolate curls, or even a dusting of crushed Pink Salt for that salty-sweet finish that elevates every bite.
Whether you’re customizing it for dietary needs or just for fun, this cake adapts to whatever flavor path you want to take.

Serving, Storing, and Savoring Reese Cup Ice Cream Cake
How to Slice and Serve Reese Cup Ice Cream Cake Like a Pro
Reese Cup Ice Cream Cake is a frozen showstopper—but the way you slice and serve it can make or break the experience. Once your Reese Cup Ice Cream Cake is fully set, let it sit at room temperature for about 10–15 minutes. This helps soften the layers just enough so your knife glides through each one—fudge, peanut butter, cookies, and all—without cracking.
For clean slices, warm your knife with hot water and wipe between each cut. This little trick keeps your Reese Cup Ice Cream Cake looking as incredible as it tastes. When serving guests, a drizzle of fudge, a dollop of whipped cream, and a few extra Reese’s on top will turn each slice into dessert art.
Planning a dessert spread? Pair your Reese Cup Ice Cream Cake with chilled treats like Not Yo Mama’s Banana Pudding or fresh fruit to balance the richness. It’s also perfect on its own—late-night cravings, birthday parties, or lazy Sundays. Whenever you enjoy it, this Reese Cup Ice Cream Cake turns ordinary moments into delicious celebrations.
Storing Reese Cup Ice Cream Cake for Freshness and Flavor
Your Reese Cup Ice Cream Cake deserves to stay perfect until the very last bite. To store it right, keep the cake in its springform pan and cover tightly with plastic wrap, or transfer slices to an airtight container. It holds beautifully in the freezer for up to two weeks.
Want to make Reese Cup Ice Cream Cake ahead of time? Go for it. It’s a lifesaver for stress-free hosting. You can even pre-slice the cake, wrap each piece individually, and have a ready-to-go dessert stash any day of the week. For portion control or meal-prep vibes, that’s gold.
If you’re looking to lighten things up, try a healthier twist on Reese Cup Ice Cream Cake using low-sugar ice cream or a base inspired by our Pink Salt Weight Loss Recipe. Even with swaps, you’ll keep the soul of the Reese Cup Ice Cream Cake—rich, cold, creamy, and satisfying to the core.
Whether you’re sharing it or saving it all for yourself (no judgment), Reese Cup Ice Cream Cake brings comfort, fun, and that nostalgic peanut butter-chocolate magic we all crave.
FAQs About Reese Cup Ice Cream Cake
1. How long does Reese Cup Ice Cream Cake need to freeze before serving?
For best results, freeze your Reese Cup Ice Cream Cake for at least 4–6 hours before serving. If you can let it chill overnight, even better. This ensures each layer sets perfectly and slices cleanly.
2. Can I make Reese Cup Ice Cream Cake with non-dairy ice cream?
Absolutely. Reese Cup Ice Cream Cake is highly adaptable. Use your favorite dairy-free alternatives like almond milk or coconut-based ice creams. Be sure to check your peanut butter cups, too—many vegan versions are available now.
3. What’s the best pan to use for Reese Cup Ice Cream Cake?
A springform pan is ideal for Reese Cup Ice Cream Cake because it allows you to remove the sides cleanly and showcase those beautiful layers. If you don’t have one, a deep pie dish or loaf pan works, too.
4. Can I prep Reese Cup Ice Cream Cake in advance for parties?
Yes! That’s one of its biggest perks. Reese Cup Ice Cream Cake can be made up to two weeks ahead. Just wrap it tightly and freeze. Right before serving, garnish with fresh toppings or a quick drizzle of fudge.
Conclusion: Reese Cup Ice Cream Cake Is the Frozen Dessert Everyone Deserves
Reese Cup Ice Cream Cake isn’t just another no-bake dessert—it’s a celebration in every bite. From its crunchy cookie base to its creamy ice cream layers, peanut butter swirls, and iconic Reese’s pieces, this cake hits every note. Whether you’re making it for a crowd or freezing slices for yourself, every version is a win.
This cake fits Sweetain’s mission to make recipes that feel good, taste better, and work for real life. It’s satisfying, simple, and designed for joy—just like Peanut Butter Cup Dump Cake and other Sweetain favorites.
So next time you’re wondering what to bring to the party—or how to reward yourself after a long week—make Reese Cup Ice Cream Cake. No regrets. Only sweet, frozen happiness.
Want more treats like this? Follow along on Facebook for fresh recipe drops, and get inspired by our visual boards on Pinterest where dessert dreams become ideas.

Reese Cup Ice Cream Cake: The Ultimate Indulgent Treat for Peanut Butter Lovers
Ingredients
Method
- Combine the cookie crumbs with melted butter. Press firmly into the bottom of a springform pan. Freeze for 30 minutes.Spread half of the softened vanilla ice cream over the crust. Freeze again for 1 hour.In a bowl, mix peanut butter with a few spoonfuls of whipped topping (optional) to make it spreadable. Layer over the ice cream.Spread remaining ice cream over the peanut butter layer.Sprinkle chopped Reese's Cups evenly over the top and drizzle with hot fudge sauce.Freeze the cake for at least 4 hours or overnight.Before serving, let the cake sit at room temperature for 10–15 minutes. Slice and serve with whipped topping, if desired.